Tuesday, August 14, 2018

Hidden Staff

So your student has learned finger numbers and how to play by number (or color). How do you transition them to playing on the staff? The staff can be daunting. All that ink on the page is intimidating and overwhelming. So start by introducing just part of the staff (treble clef, for example) with this fun game.

Supplies:

  • White Poster board
  • Black construction paper
  • Print-out of a large treble clef
  • Print-out of a treble staff as a reference
Lesson:

Cut the construction paper into 5 long pieces that fit across that each fit along the length of the poster board (I had to glue two strips together to fit). Cut out the large treble clef. "Hide" these 6 items around the room (I taped them on the wall).

After showing your student the smaller staff and explaining that there are 5 lines and that the funny, squiggly thing is called a treble clef. Then have them find the lines and treble clef. They need to build the staff on to the poster board.

This lesson usually only takes 5-10 minutes, so be sure to use this as just an introduction to the staff. Stay tuned for next week's game of introducing notes on a staff.


Friday, August 10, 2018

Balloon Fingers

One of the most basic lessons in piano is numbering fingers. For older kids, numbering fingers can take all of 5 minutes to understand. But for preschool-aged students, it can take a while to understand what the finger numbers mean. So instead of reteaching this concept for the first 10 minutes every lesson for a few weeks, use this game to help solidify the finger numbers.

Supplies:
  • 5 balloons
  • A marker
  • A basket (i.e. laundry basket, etc.)
Lesson:

Blow up the balloons and number them 1-5 with the marker. Have the balloons spread throughout the room before your student arrives. (You can hide them to whatever degree your student has the ability to find them).

After teaching your student the finger numbers, explain that you're going to play a game. Have them find the balloons (one at a time) and tell you the corresponding finger. Then they get to try to make a basket with the balloon. If you want to change the lesson up halfway through, point to a finger and have them find the corresponding balloon. And then have them make a basket.

Have you tried this? Let us know how it went in the comments below!


Tuesday, July 10, 2018

Hide and Seek Forte

Teaching your young students the difference between piano and forte? Here's an exciting (and simple) lesson to get some of those wiggles out!

All you need is some small pictures of loud/quiet things. I usually printout clipart pictures of things like an elephant, butterfly, drums, fireworks, bee, etc. Before the lesson, hide these pictures throughout the room (keep in mind the age of your student so they can still find the pictures while having fun).

Explain to your student the difference between forte and piano. Have your student practice the difference by as softly and as loudly as they can.

Then have your student find the pictures hidden throughout the room. Every time they find a picture, have them come back and put it in either the forte or piano pile. For an additional learning experience, have your student run to the piano and play the way an elephant would play or a butterfly, depending on what picture they find.

Let me know below how your students like this lesson!

Image result for elephant clipartImage result for butterfly clipart

Monday, June 18, 2018

Snakes and Frogs

This lesson is so fun when teaching Legato and Staccato! It's also a good fall-back when you need to fill a few extra minutes at the end of the lesson once your student has gotten the hang of staccato and legato. Here are a few different ways of introducing and teaching this concept. Try some! (I've found that even if you stay on the same topic but have lots of different games, young students will continue to give you their attention.)

Here's what you'll need:

  • White board/Paper/Poster Board
  • Printed and Cut pieces of paper with snakes and frogs
  • Small cut pieces with lily pads
  • Small cut legato slurs
Lesson:

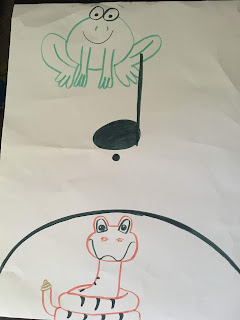
On the white board/paper/poster board, draw a frog on top of a staccato note. Then draw a snake under the legato slur. Explain to your student that the staccato notes should be played like a frog (very bouncy) and the slurred notes should be played like a snake (slithering).

**Note: If you have a large floor piano pad, pull it out now. Have your student practice hopping and slithering whenever you yell out Staccato or Legato.

Demonstrate the difference between these two, and then have your student try. Then play a game by saying staccato or legato and have them play it.

Tape the lily pads and the slur to the keyboard (see pic). Have your student "race" up the piano by playing every key. Whenever they get to a lily pad, they have to "hop" on it. When they reach a slur, they have to "slither" across. Time them to see if they can get faster the second time.

Hide the pieces of paper with snakes and frogs throughout the room. Have your student find them. Every time a piece of paper is found, your student has to run back to the piano and play either staccato or legato (depending on if they find a frog or a snake).

Have you tried this? How did it go? Do you have other ways of teaching legato vs staccato? Let us know in the comments below!


Wednesday, June 13, 2018

Motivating Practice

You've done your job. You've made it through the full 30 minute lesson; you've given your student new things to practice. Now it's all in your student's hands. And their parents'. But surely there must be something you can do to encourage your student to practice during the week! Maybe going over to their house every day to remind them? Is that too creepy? Okay. Scratch that. How about just calling them every day? Hmm...🤔🤔🤔 Nope. That's not gonna work. There has to be something!

There is! SURPRISE! Okay. So it's not really a surprise. And I'm sure most of you already have some great ideas that you've put into practice. So this post we're just going to talk about pros and cons of certain practice motivators so you can decide what will work best for you and your students!

Practice Sheets/Prizes
This is a piano lesson classic. Give your students a piece of paper with squares. Every day that they practice, they get to color a square. After they color so many squares, they get to pick a prize (I usually get my prizes at the dollar store).
Pros: 

  • Students feel rewarded for practicing
  • You decide how much they have to practice to get a prize
  • Parents can be included in this (have the parents in charge of the paper)
Cons:
  • There isn't a specific amount of time that they have to practice
  • Students could just rush through their pieces
  • Often students lose the paper

Stickers
This was my favorite when I was little. Get some fun stickers (dinosaurs, minions, princesses, robots, etc.). If a student has trouble with a certain part of the song, put one sticker at the beginning of that part and one at the end. They have to practice that part 3 or 5 or 10 times before playing all the way through. When they pass off a song, they get to put a sticker at the top of the song.
Pros:

  • Your student works on the hardest part of the song
  • You reward your student for good practicing (not for just rushing through the songs)
  • You don't have to give prizes
Cons:
  • Some students get burned out after practicing the challenging section over and over
  • Some students don't see stickers as motivators
  • For the first several months, songs are too short to have a "challenging" section

Practice Parties
Once your student passes off so many songs or practices so many days, they get to come to the piano practice party. All the students that have met their goals get together to play piano games and eat some snacks.
Pros:

  • You only have to deal with the reward system every so often (every 3 months, every 6 months)
  • If your students are friends, they can encourage each other
  • It allows you to dive into some more theory than lessons allow you to (you can even teach about a different composer each party)
Cons:
  • You would have all your students at the same time
  • You can't work around everyone's schedule, so some might be left out

Parental Motivators
Get parents involved in practicing at home. Have the parents sit with the student so the student can show off what they're learning. Send some games home that your students can play with their parents. If you have parents sit in on lessons, give them specific things to do with their child.
Pros:

  • Kids are more likely to practice every day
  • Parents can see the progress their child is making week to week
  • You don't have to worry about rewards
Cons:
  • Parents and kids can have a war of wills during practice sessions
  • Some students will burn out if they feel like they're being bossed during lessons and practice

What do you think of these motivators? Do you have other practicing techniques that have worked for your students? Let us know in the comments below!

Monday, June 11, 2018

Hippo Helper

So you've taught your student lots of new things, but you want to make sure they remember it all. But review lessons are so boring--for you, for the student. How can you keep them engaged in a review session the entire time?

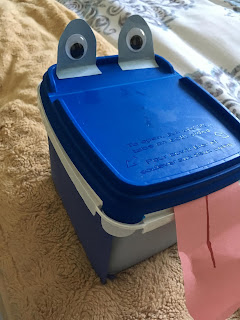
Introducing the Hippo Helper! This is a great tool that you can use and reuse whenever you need to review or fill a little time at the end of a lesson. It allows kids to feel like they're in control of the lesson and keeps them engaged and entertained the whole time.

Supplies:

  • Plastic container (I used an old dishwasher detergent box with a pop lid)
  • Popsicle sticks
  • Marker
  • Construction paper
  • Googley Eyes

Instructions:

Decorate the container to look like a hippo. I used blue construction paper and glued it around. Then add the googley eyes to the top. On the popsicles sticks, write things that the student has learned. Some examples:
  • Two black keys
  • C
  • Quarter note
  • Forte
Put the popsicle sticks in the container. During the lesson, let the student pull out the popsicles sticks one by one. I find it works best if you keep the hippo far enough away from the piano that the student has to run/walk back and forth. This helps them get their wiggles out, and it keeps the giggles coming.


Wednesday, June 6, 2018

Attention Grabbers

Let's talk about the hardest part of the job (whether you're the parent or the teacher): ATTENTION. You have 5, maybe 8, minutes before the preschooler is running for the next thing. It's exhausting just watching them, let alone trying to corral all that energy into something instructive. So how do you keep your students' attention throughout the lesson?

I've found the best way to keep young students' attention is to keep the lesson as physically active as possible. When young kids are sitting at the piano, they often lose focus within minutes because they want to play. So use that energy to your advantage! I like to do an active game, then play at the piano for a minute, then another active game. It also helps if you mix an active game with playing the piano (i.e. have kids find a hidden dynamic symbol (f) and then have them run to the piano to play loud). Look throughout the site for some interactive game ideas.

Young students have so much excitement for learning to play the piano! Most young students come running in to the room because they can't wait to play and learn. Keep that enthusiasm up from the very beginning of the lesson by letting them feel like they control what they're learning. Give them a choice of what they want to do first. I like to have the activities out on the table so that my students can come and look at what they have to look forward to.

Variety is good, but it's easy for kids to get overwhelmed. Change up games and lessons, but keep at least one tried and true lesson around every day. I like to use the Hippo Helper or Crab Pom-Poms each day. This helps kids to have a little bit of a routine so they know what they're supposed to do.

Kids get distracted. *Gasp* 😲😲😲😲 I'll just pause for a minute. Let that sink in. Over the shock? Okay. So you're sitting in the lesson and have spent so much time and effort in preparing these fun lessons. The student is having fun and learning. And suddenly, in the very middle of the lesson, your student decides to jump ship. DON'T PANIC! Often we think that our students need to completely finish the lesson for them to understand the concept. But kids stay focused as long as they feel like they're learning something and having fun. So when they stop the game, they're letting you know that they've learned the concept well enough to move on for now. Come back to it later. Move to the next activity. Let your student dictate how long they want/need to practice certain concepts.

Recap:

1. Physically active games throughout the lesson
2. Give students a choice
3. Always keep at least one old game/lesson
4. When your student gets bored, MOVE ON

Have you found other ways to keep young students' attention throughout the whole lesson? Let us know what works for you!

Monday, June 4, 2018

Note Values

Teaching young students the values of different notes can be tricky. This is a tried and true activity that helps students understand whole, half and quarter notes. This isn't an original Preschoolers and Piano idea, but it's definitely worth posting here for you all. Enjoy!

Supplies:

  • Construction Paper
  • White Printer Paper (3 sheets)
  • Marker (or printer)
Instructions:

Cut one printer paper sheet into 4 sections. Cut another in half. Leave the last one intact. On each of the 1/4 size pieces, draw a quarter note. One the 1/2 pieces, draw a half note. And on the full page, draw a whole note. (You can also use the computer to print them out. Just make sure you use 1/4 of the page for each quarter note, etc).

Glue the notes on to construction paper (opt.). Be sure you keep the size of the paper accurate (1/4 page for quarter notes, 1/2 page for half notes, etc).

Show your student the whole note (sometimes it helps to have 4 written on the page) and explain this is a whole note and gets 4 counts. Then show the half notes and explain that two half notes are the same as one whole note (put the pages on top and show that two half notes are the same size as a whole note). I used to teach quarter notes first, but it was hard for the young students to understand a measure. But this visual aid helps them gain a more concrete understanding of a measure and how the notes relate to each other.


Saturday, June 2, 2018

Caterpillars and Butterflies

Spring is in the air! That also means spring fever. You know what I mean. Kids are even more energetic (no idea where the extra energy comes from); they have a much smaller attention span; and you have less control and less patience. I've learned that the best way to beat the spring fever is to have spring-related lessons.

This one is my favorite spring lesson. It helps kids learn the musical alphabet, but it can also be adapted to many other things like note names and musical theory.

Supplies:

  • Construction paper
  • Crayons (or markers)
  • Googley eyes
  • Pipe cleaners
Instructions:

Out of the construction paper, make butterflies and caterpillars. You will need 7 of each. I used a long piece of white construction paper for the body of the caterpillar and put a head and tail on either end. You could also make the caterpillar body out of circles. Just make sure there's enough room to write on it.

Write two letters that are next to each other alphabetically (i.e. A B or E F). Then put a ? instead of the following letter. And finally put the letter that comes next (i.e. A B ? D or E F ? A). Then on the butterfly wings, write down each letter of the musical alphabet.

The goal of the lesson is for the student to find the butterfly that matches the caterpillar. For students who have a hard time understanding the musical alphabet repeats, it helps to do this with letters printed out that stretch 2 octaves so they can see the pattern on the ground.

This also works for older students who can read. Write down theory names (i.e. Forte or Quarter Note) and have the butterflies match with the symbol.


Tuesday, May 8, 2018

Rainbow Music

Have you ever noticed that little kids love rainbows? During every lesson, we talk about rainbows and colors at LEAST 3 times. 🌈 So the trick has become how to incorporate their love of colors into piano lessons. And then it hit me.

RAINBOW MUSIC

Music and piano keyboards are black and white (so boring!). But what if we change that up for our young students? This idea is so fun, easy and can be reused for every lesson! Here's what you'll need:


  • Colored construction paper
  • White printer paper
  • Crayons
  • Tape

Cut the construction paper into strips for that are the same size as a piano key (one strip per color). Tape those strips onto the keyboard (one per key). Then, using the color on the piano as a key, write the notes to a simple song (i.e. Twinkle Twinkle, Itsy Bitsy Spider, etc.).

This is a great way to get young students to play the piano without having to teach them the different notes on a staff. I usually let my students play the notes with whatever finger they decide. However, when we're working on certain fingers (whether building strength and dexterity or remember correct finger numbers), I tell them which finger(s) to play.

Saturday, May 5, 2018

Intro

Hello all!! Let me introduce the purpose of this blog by sharing a story. I got a message from a mom who was asking about piano lessons for her daughter (whom we will call Sally). I sent back the usual questions: has she ever had music lessons before; does she have a way to practice during the week; how old is she? "No. Yes. And 3 1/2."

😮😮😮

My initial thought was, "3 1/2??? There's NO WAY I'm going to spend a half hour trying to wrangle a 3 1/2 year old's energy." So I explained that young children don't have the attention span nor the muscle dexterity to play songs for a half hour at the piano. Her mother asked if we could do a trial lesson before I decide not to teach her. I agreed.

The day of the lesson arrived. Sally showed up, excited, energetic, and extremely adorable. She was also very polite, attentive and quick to understand concepts. The half hour lesson went by so quickly that I kept thinking my watch was jumping ahead! But I learned more in that lesson than Sally did. I learned that preschool-aged children can learn and often have more excitement to learn piano than other students. I agreed to teach her. I was so excited! And then I went to the source of all knowledge for some lesson plan ideas...the Internet.

With the internet's resources at my fingertips, I was ready to go! I Googled, Pinterested and Instagrammed every combination of words I could think of to find lesson ideas. And finally, after days and weeks of research, I finally found it!

NOTHING.

Yep. The internet let me down. *Pause for gasps* So I decided to take matters into my own hands. This blog is to help teachers and parents of young piano students find lesson ideas, practice tips and wiggle activities. Feel free to reach out with any questions or comments on what worked with your students!